

How To: Lead Rope Solo
A proven method for lead rope soloing near your free climbing limit
Lead soloing solves a problem that we all have – sometimes a partner just doesn’t line up for your specific objective or time window. But also, the freedom and self-sufficiency required to go for a big climb alone create their own unique experience.
This desire for big adventures in solitude has been a common path for many climbers – decades of aid solos on El Cap are a clear example. This aid soloing allows two free hands to manage the self belay systems, so even rudimentary knot shuffling can work. But our modern version of redpointing free climbs, specifically, means the system must flow smoothly and only ever require one hand to manage.
General Premise:
A high performance lead solo free climbing system self-feeds while you climb, with only occasional one hand management every few body lengths. This self-feeding comes by managing free side rope weight with a “cache loop”. If using a GriGri (or mis-using, rather – this is off label usage!) as your primary solo belay device, this is the “brake” strand of the rope. The full dangling free rope weights the device, it will lock up in place and prevent movement. But, if the climber maintains a smaller “cache loop” of a few meters of free rope hanging down will pull smoothly through the device.
When setting off on the pitch, the rope end is fixed at the lower anchor, and the belay device is oriented as if you were rappelling upward with sufficient free rope to reach the next anchor. Gear and/or rbolts are clipped into the “protection strand” of the rope while ascending, allowing a relatively normal lead climbing experience. The cache loop is occasionally tended with one hand to maintain the free rope needed to free climb.
Primary Belay Devices:
The System: GriGri+ Held Upwards & Upside-Down:
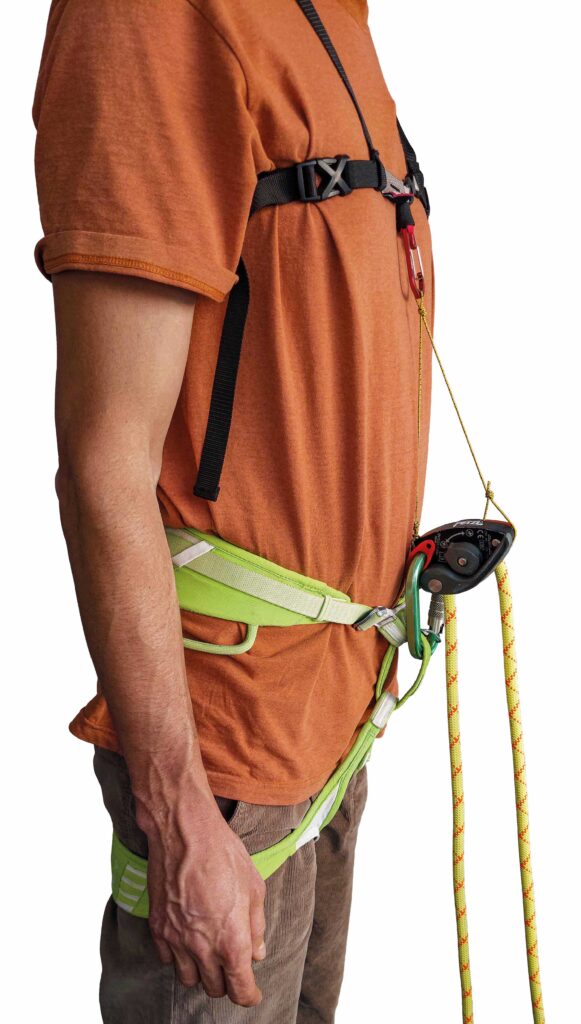
The stock GriGri+ works really well for Lead Rope Soloing, if Held Upwards and Upside-Down (HUUD) with a chest harness (Fig.1). In this orientation, the rope creates a smooth single bend between the protection side and free side of the rope. The smoother the bend, the easier the auto-feeding.
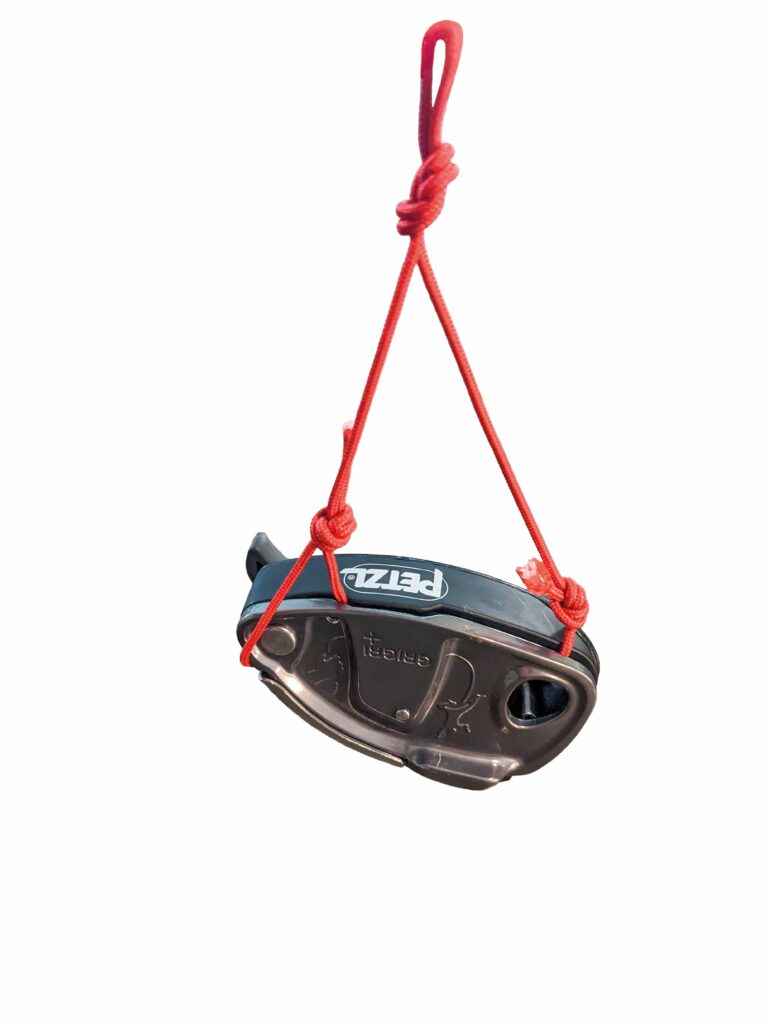
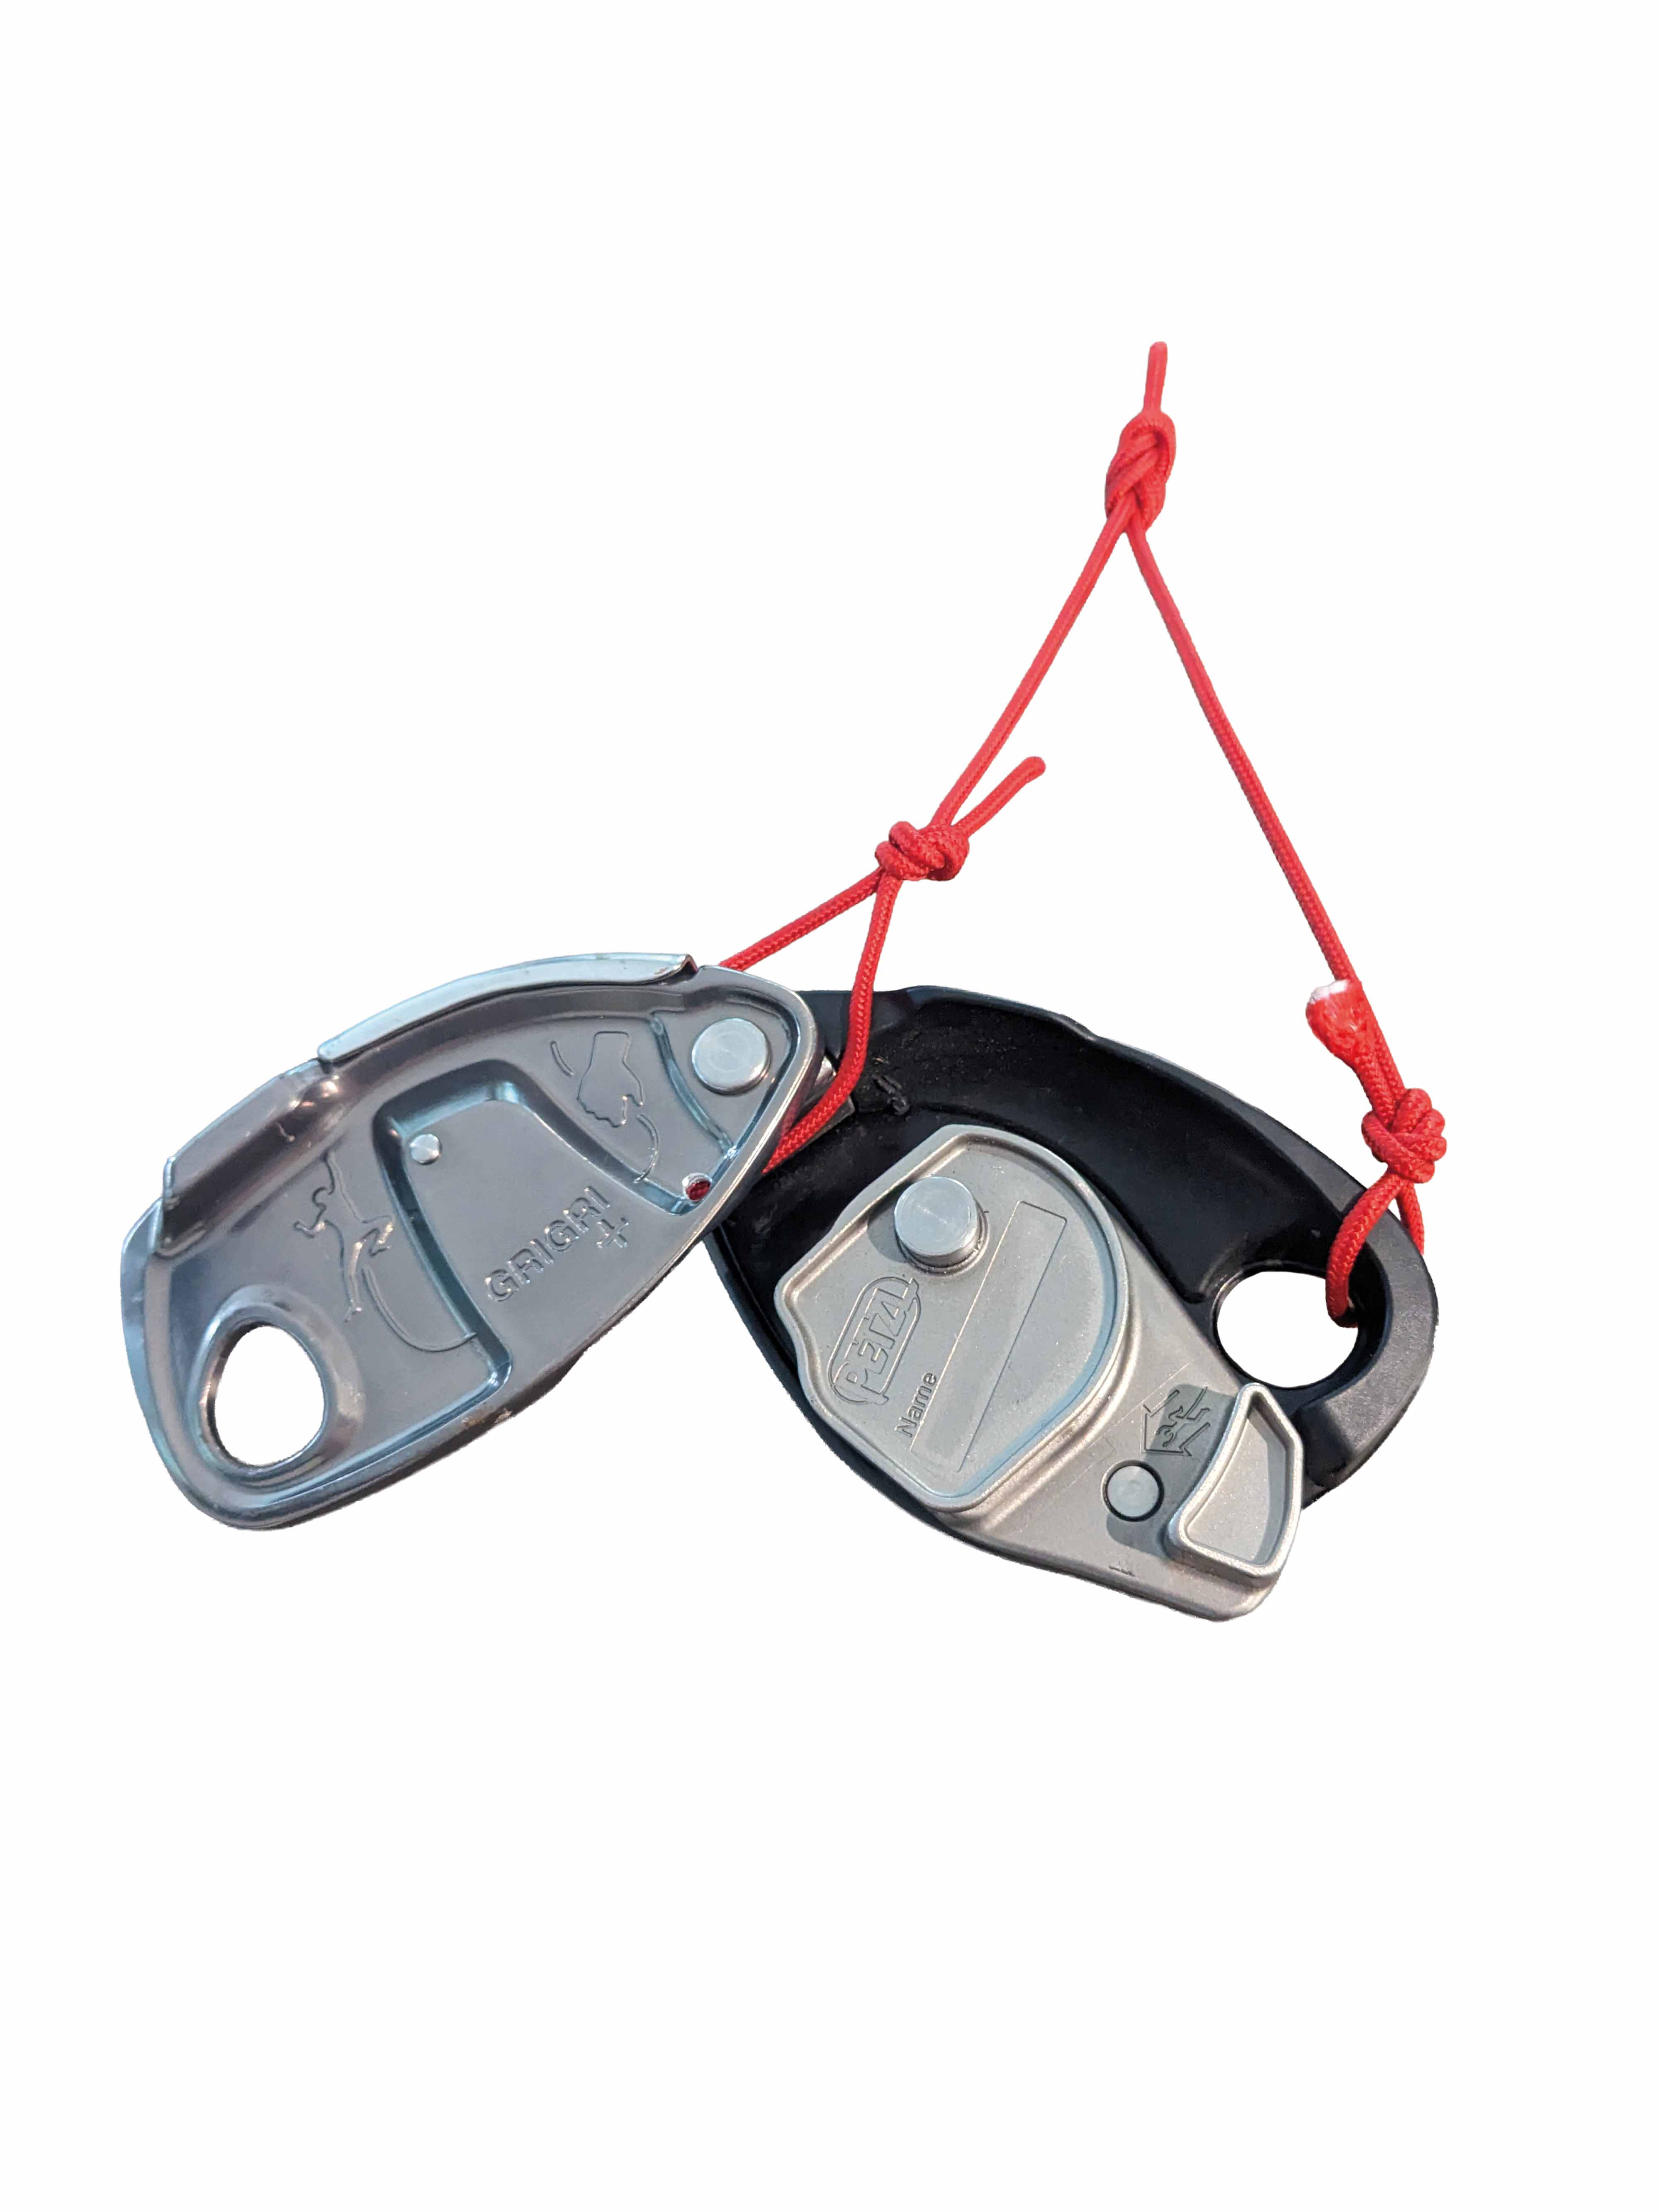
This can be achieved without modifying the GriGri by tying a small ~2mm cord around the sideplate pivot point and through the body side of the carabiner hole, as shown below (Fig. 2). This cord does sit inside the rope path and may wear out, especially while rappelling.
The Top Rope Mode of a GriGri+ is helpful to the lead soloing because it reduces the threshold for cam engagement. This means a more reliable catch in our off label usage scenario.
The GriGri should be held up relatively tight with the clip-in loop described above, as snug as possible without impeding upper body mobility. A rigid chest harness gives a more positive hold for feeding down slack, needing less slack pumps per clip, but some prefer the comfort of a stiff bungee.
ATTENTION:
It is of significance to note – THIS SYSTEM LIKELY WILL NOT CATCH UPSIDE-DOWN FALLS! Always use backup knots. This system also relies on clear misuse of climbing devices, so you must conduct your own personal risk assessment. Always re-check each device and attachment before setting off.
GriGri Carabiner Crossload Protection:
Carabiner crossloading becomes a risk of the GriGri or any other self belay devices with one connector point. (This is true with all belay devices used in partnered belaying, but lead soloing forces can be higher if falling directly onto a fixed rope point).
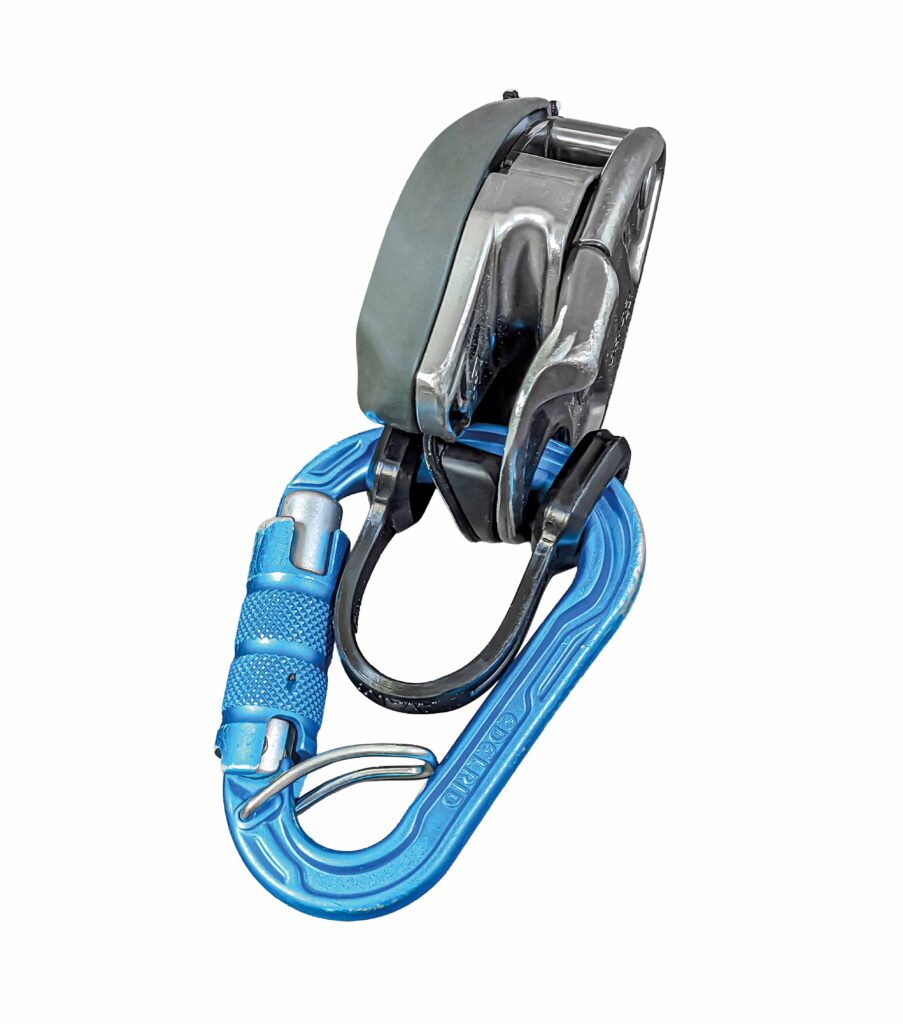
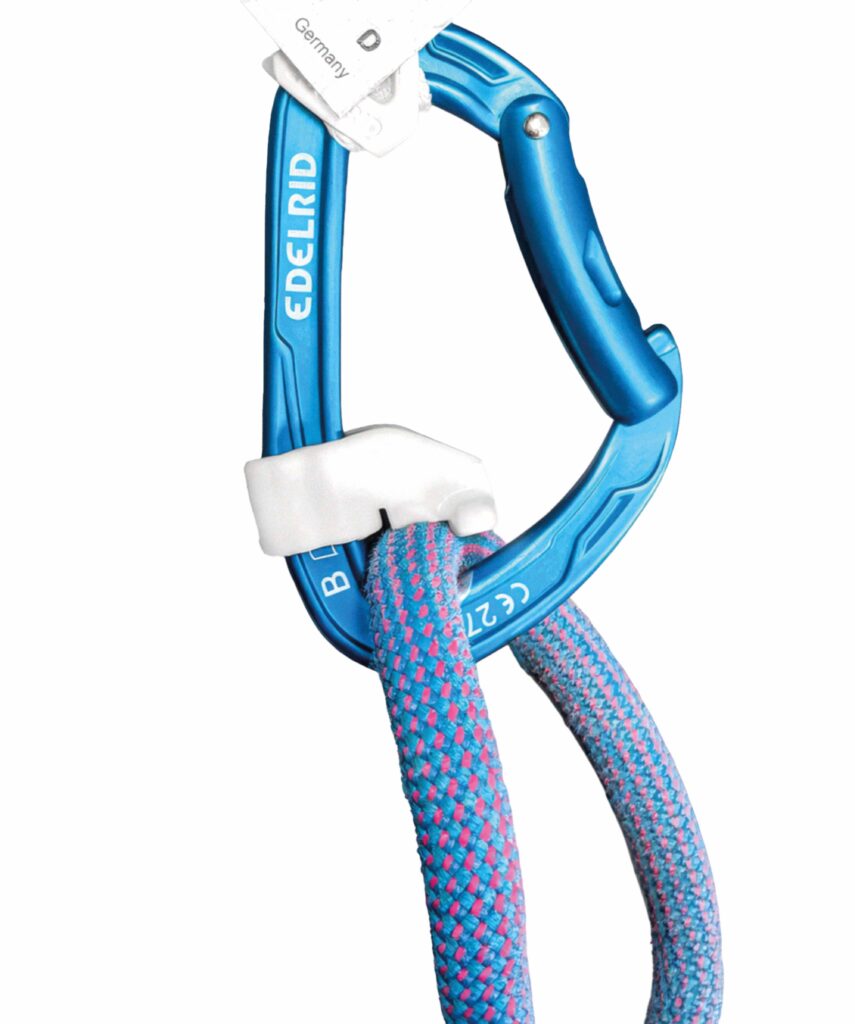
The risk of a crossloaded GriGri carabiner exploding can be mitigated by using a modern belay biner with a captive feature (Edelrid FG, BD Gridlock, DMM Ceros, etc). It can be reduced further yet by using a device-side crossload protector such as the Avant Flex-Link (Fig. 3). With these redundant crossload limiters, an aluminum bodied carabiner is protected from weak loading orientations. But some climbers use industrial steel carabiners, or steel malions even, for further peace of mind at this primary connector. And, it is certainly worth a foolproof locking gate such as a triple action twist lock.
Backing up the Primary Device:
Harness Sling Add-on for Cache Holding – Structural Gear Loop:
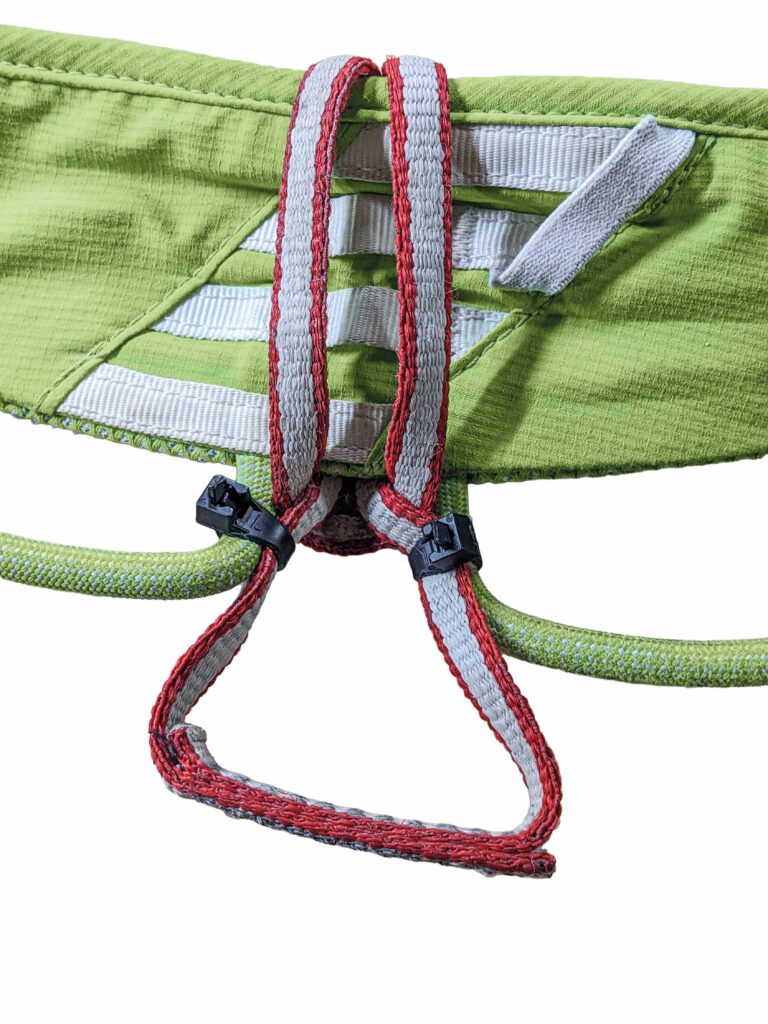
A 30cm sling can be hitched around the harness waistband with a girth hitch, either in front of both gear loops or in between the existing loops, to create a structural racking loop to hold backup knots. Velcro, zipties, or One-Wrap cable holders can be used to hold this sling in place against the gear loops (Fig. 4) Some harnesses have structural gear loops integrated , but this DIY add-on method can be added for just the occasional lead solo pitches to your daily harness.

Managing the Cache Loop
The cache loop is the key for this auto-feeding system to work, let’s consider the options of maintaining a properly sized cache loop for a full pitch. This breaks into two categories: “pre-cache” and “continuous-cache”.
The Pre-Cache Method:
Stacking the rope into multiple cache loops prior to setting off on the climbing allows the system to auto-feed for the entire pitch, with only the occasional release motion as each loop runs out. I pre-cache into loops with three to five meters of rope for most LRS free climbing, starting from the free side next to the device, and then creating larger loops working towards the tail of the rope.
The rope weight is on the climber’s harness, and the loops dangle down in a visually confusing manner, but it is less distracting for the climber than it first appears. The rope weight on the protection side is held by backfeed keepers (to be discussed), so the overall rope weight held by the climber is not so different than a regular belay. Most of the hard LRS redpoints have been done with a pre-cache system.
“Clove Dump” Pre-Cache Option:
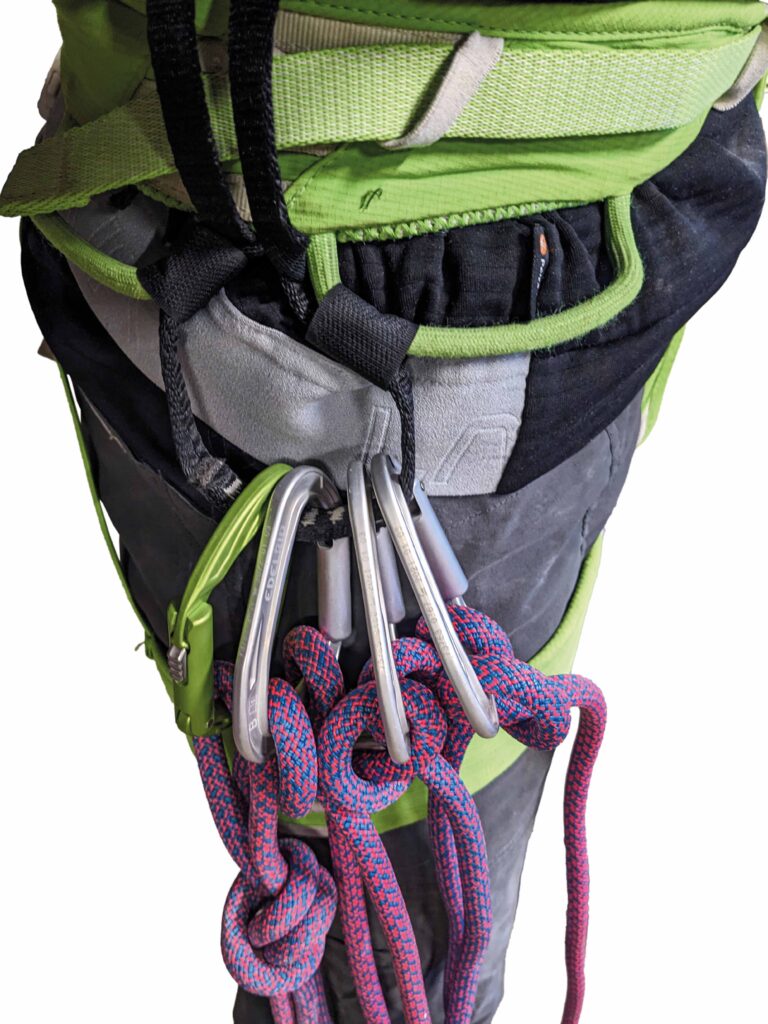
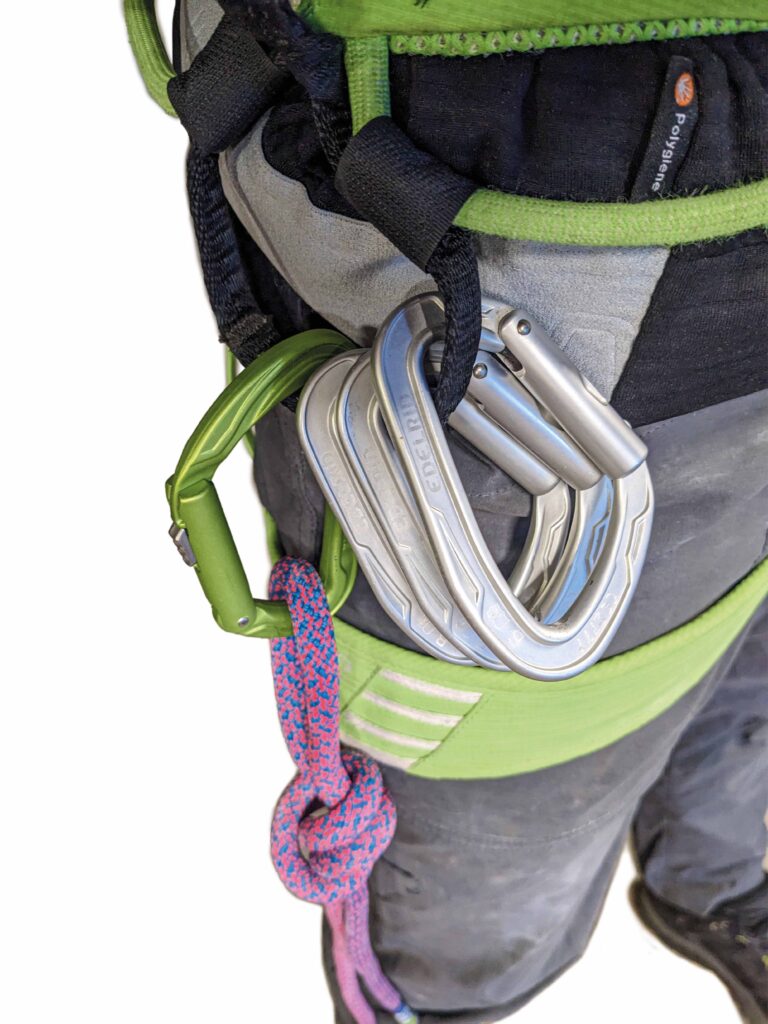
The cache loops can be held to the climber’s harness with a loose clove hitch loaded onto upside-down, gate in carabiners, with a snag-free nose (Fig. 5). This creates a releasable knot that is
also a full-strength backup if hanging off a structural gear loop. With a one-hand motion, the clove hitch of rope is easily dropped off the open carabiner. The last knot holding up your loops can be an overhand on a locker – this final backup is never released.
Benefits
- Creates a structural backup knot between each loop, in case the GriGri slips, its carabiner explodes, or to stop upside-down falls
- Relatively easy one-handed releasing
Downfalls
- Not easily released across body with the opposite side hand
- Clove hitches can induce twists into rope (Alternating clove backup “handedness” left-handed clove vs right-handed clove can help mitigate some rope twist)
- Multiple cache loops can tangle with each other (I make them in slightly increasing lengths to help to mitigate this)
- More rope weight is on the harness than a continuous cache
- More metal and bulk than other cache alternatives
- Loops of rope hang down and can snag on rock features for lower angle terrain
“Slip Knot” Pre-Cache Option:
A slightly less secure, but still one-hand releasable cache knot is the slip knot variant, used extensively by Alex Huber and Fabian Buhl (Fig. 6). This method creates a knot that holds tight in the direction towards the GriGri, strong enough to block the GriGri against a headfirst fall, but still releasable with a one handed tug on the cache side. Since the knot only holds about 4kN , these can live on a regular gear loop and function as a blocker knot.
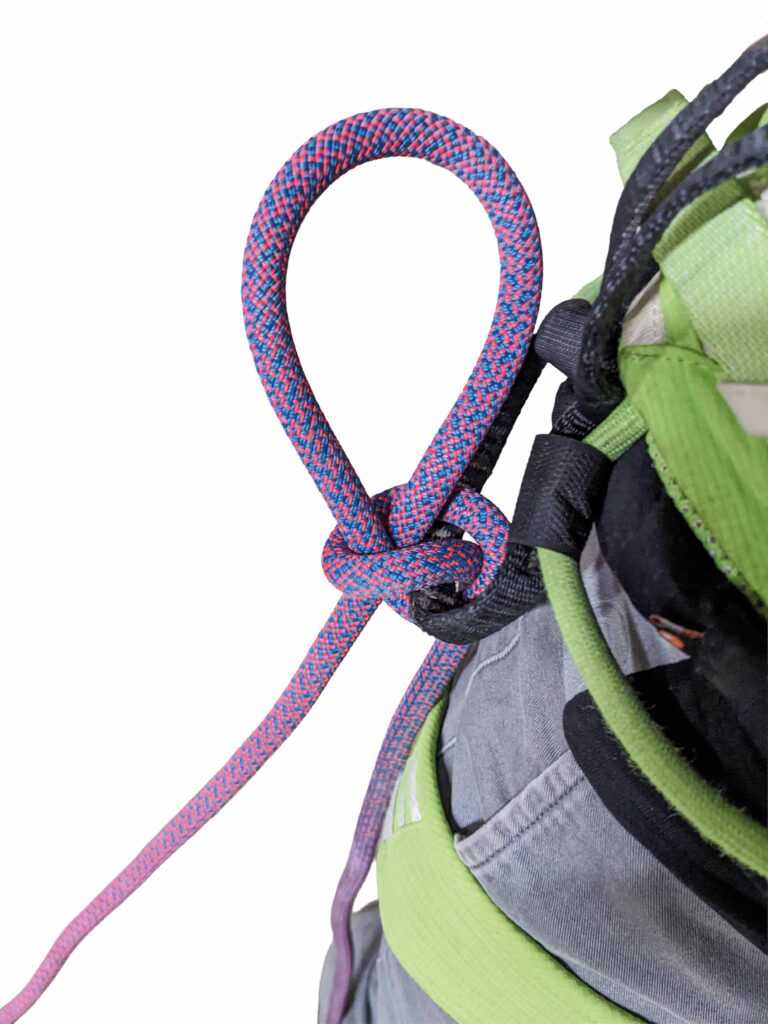
Using an add-on sling loop to hold them on your harness keeps gear space open, but the knot itself is not structural in the same sense as the clove above. To tie, pass a bight of rope through the inside of a gear loop, add a full twist, and then pass a separate bight of rope through this twisted loop from around the outside of the gear loop. Cinch tight with a ~6″ captive loop.
Benefits
- Creates a blocker backup knot between each loop, in case the GriGri slips, or to stop upside-down falls
- Relatively easy one-handed releasing
- No extra metal gear needed
Downfalls
- Knot will only hold ~4kN, doesn’t backup a full GriGri or carabiner failure.
- Knots can release themselves if the cache loops snag on the rock
- Not easily released across the body with the opposite side hand
- Significant added bulk from the captive loops
- It can be hard to find the correct cache side strand to pull
- Multiple cache loops can tangle with each other (slightly increasing lengths help to mitigate this)
- More rope weight is on the harness
- Loops of rope hang down and can snag on rock features for lower-angle terrain
The Continuous-Cache Method:
A more active cache method is to have a single cache loop that is maintained with a one-hand motion, pulling free rope into the cache loop every 5-20 feet of climbing. One must be vigilant to refill the cache loop often, to not run out of rope and pull tight on the GriGri brake strand – this will short-rope you and impeded progress.
The continuous-cache method usually relies on a Progress Capturing Pulley (PCP), such as a Micro-Traxion, Spoc, etc on one’s harness (Fig. 7). The free rope is stacked on the ground or in a rope bag. This method does not provide any backup to the GriGri system at this point! Blocker knots need to be added inline to have a backup, which would jam against the PCP.
These knots then negate some benefits of the continuous-cache, causing significant snag risks, and also being difficult to remove one-handed mid-climb. This system is most advantageous for moving quickly with no backups. Using a continuous-cache with inline blocker knots is a great option for aid climbing/short fixing, where more things are already hanging off one’s harness, and you can hang at any time to deal with two-handed backup knot releases.
Benefits
- One single cache loop hanging down for less clutter and fewer snags
- Less rope weight on the harness – extra free rope can be fed out of a rope bag below
Downfalls
- Significant added motions to manage the rope mid-climb, can add pump to your redpoint!
- Inline backup knots can be used, but are not easily released with one hand, and cause more snag risk than pre-cache loops
Cache Combinations:
Pre-cache and continuous-cache methods are both useful depending on the situation, even sometimes on the same pitch. Clove dumps are a great go-to for their backup peace of mind mid-pitch, or when a move has a weird fall risk. A continuous-cache then can be good for a easier top out way up a climb, to save some weight on the harness, or if you don’t know the exact pitch length. These cache loop systems can all live harmoniously on your add-on structural gear loop for clarity of use while climbing.
Backfeeding prevention
Backfeeding rope is a significant risk to understand while rope soloing. Once the climber is up far enough vertically, the protection side rope weight can spool rope through the device in the auto-feeding direction, and create extra unnoticed slack down by the anchor. A small fall, right at a protection point, could unknowingly be HUGE! This is avoided by vigilantly cinching the fixed protection side of the rope upward multiple times throughout a pitch.
There are now small rubber carabiner inserts, such as the Avant Soft-Cinch (Fig. 8), that live on the backbone of a carabiner and create a rope cinch point to manage protection side slack in the system throughout a pitch. This accessorized carabiner lives on the rope side of the quickdraw. The draw is clipped like normal, and then the rope is pulled tight into the insert to be held in place.
These should be used every few protection points, or every six meters or so. This is a crucial part of the modern lead solo system – knowing there is no hidden slack in your self belay system prior to committing to a hard move. You can keep a dedicated set of LRS cinching draws, or add the cinchers on individualindifivual carabiners and swap them with the rope side carabiners on quickdraws before an LRS outing.
Clove hitching the rope to protection points is a tempting way to prevent backfeeding, but this removes any rope below that fixed point from assisting in energy absorption. This means hard catches, and risking factor two falls onto those clove hitched points.
Rope Choice
A skinnier rope is generally better if you are in GriGri+ TR Mode, improving feeding and reducing weight of the cache rope on your harness. I usually use the smallest single ropes on the market (8.5mm-9.0mm). Though, a skinny rope is more prone to sheath damage or even rope cuts, so care is needed to watch abrasion points if repeatedly weight the rope.
LRS climbing is particularly hard on a rope sheath because the protection side of the rope is fixed relative to the wall, so abrasion happens repeatedly at the same rope wear point. Furthermore, most multipitch pitch cleaning is done by ascending the rope, which wears harder on the rope than a free climbing follower. This risk can be reduced a bit with modern sheath technologies, such as EDELRID Protect, Mammut Core Protect or Beal Unicore.
Anchor Considerations
On a modern tightly bolted sport route, you can stick clip an inline anchor to the first two bolts of the route, from the ground! A Metolius Yellow Superclip with a long pole (I use a 320cm Avi-Probe) helps to set a secure steel locking carabiner onto the bolts. The first bolt is clipped with rope into a robust steel carabiner (e.g. consider the Edelrid Bruce Steel Triple Twist Lock), but the second bolt gets a custom-built quickdraw: steel locker on the hanger side, a short dogbone, and a 5/16″ steel mallion on the rope side.
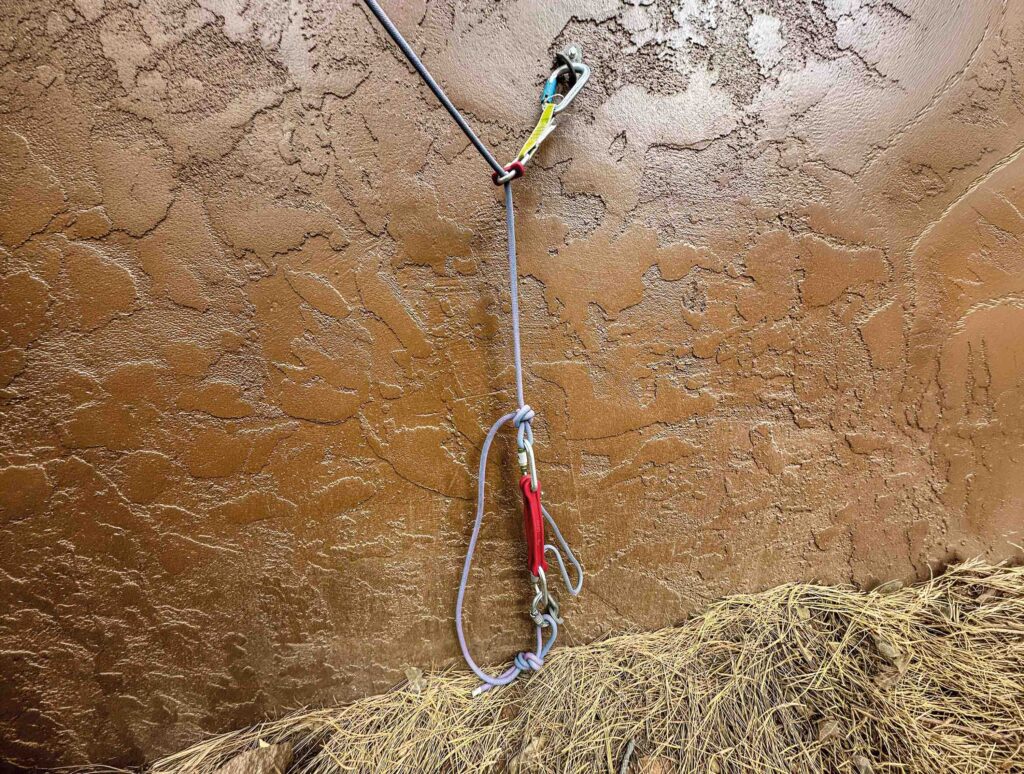
If the first bolt somehow failed or unclipped, the lower knot jams into the mallion and creates a secondary anchor point. A rope cinch accessory, such as the Avant Slide-Cinch (Fig. 10) is helpful on the mallion to cinch the first bolt carabiner upwards in a stable position.
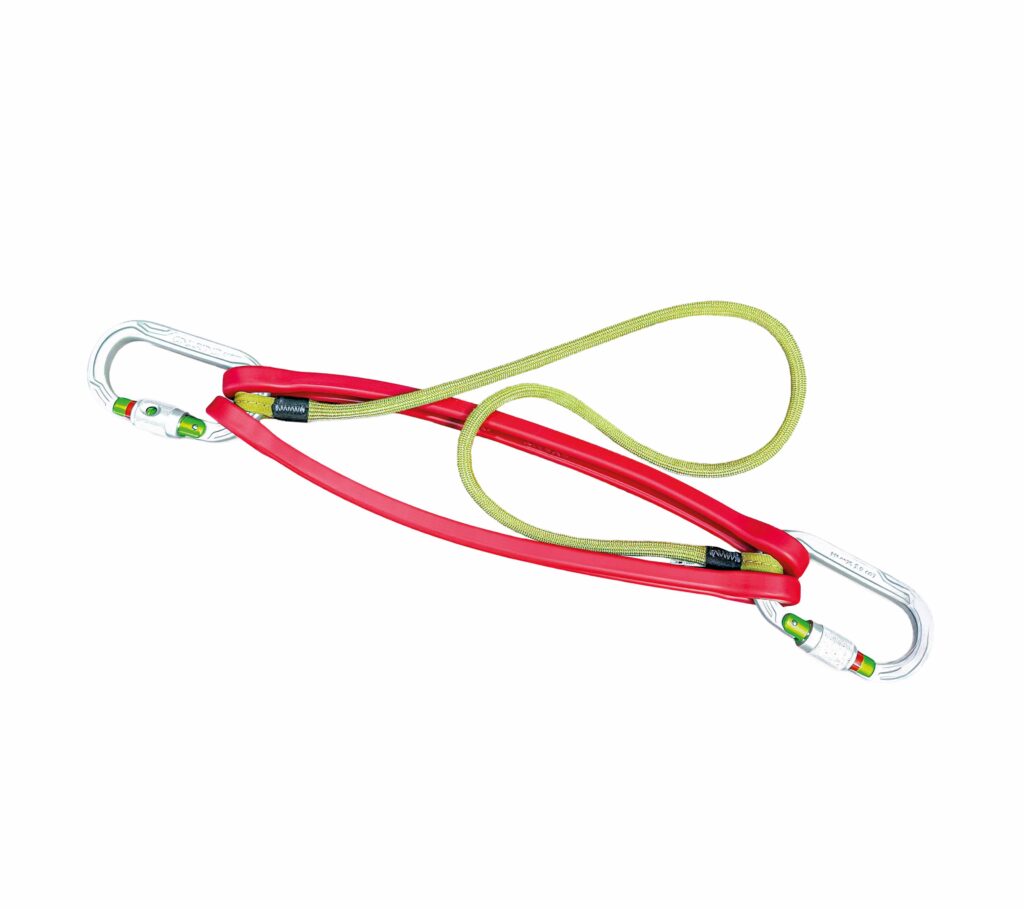
The rope is fixed firmly to the wall – there is no belayer to act as a counterweight and soften your fall. There are now lead solo absorbers to add motion to the fixed anchor point and create a softer catch. Specifically, Avant Climbing sells the Comfort Catch Absorbers (Fig. 9) – these stiff rubber links can be assembled based on your weight to create a short absorber. This absorber assembly is attached to the first bolt of your inline anchor, with a quick link cinching draw above to hold the assembly snuggly upwards.
For multipitch anchors consisting of two even bolts, I it is often easiest to create redundant inline anchor at the bottom of each pitch, rather than trying to rig an inline anchor. (Fig. 10) Though, creativity can be useful to use protection bolts from the previous pitch if needed.
Cleaning after an LRS Lead
For cragging, it is worth the extra harness weight to trail enough rope to clip the top anchor, and then immediately lower on the free strand. Be sure the rope tail is knotted! While climbing, this trailing rope hangs down to the ground behind your last cache loop. This gives a fast pitch turnaround with no system transitions at the top anchor. You can even tram in on steep pitches just like a regular crag lower.
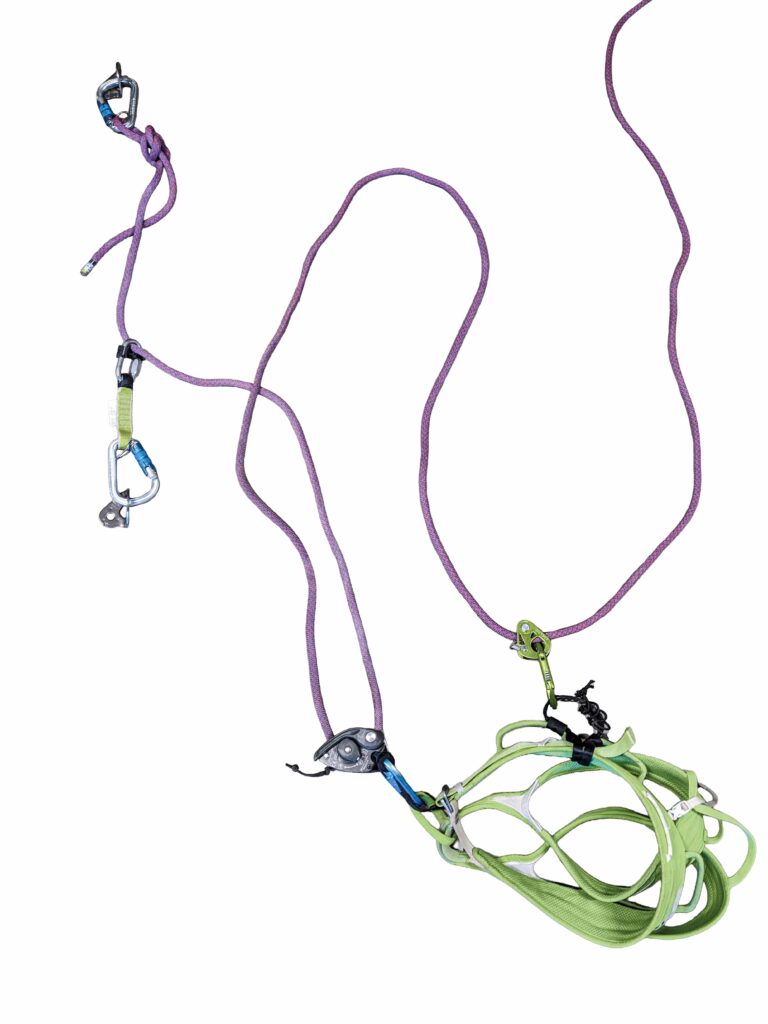
A niche option for hard cragging is to use a lead line, that is just long enough for the crag height, and a tag line of the same height. This reduces rope weight on your harness. The climber uses all of the lead line to make it to the anchor while trailing the tag. (Once at the anchor, clip into the anchor with a personal tether, fix the lead rope tail with a retrievable biner block, tying the tag line to the pull side. Then rap and clean using the lead line and use the tag cord to pull the lead line backwards through the anchor for retrieval. Some tram capabilities are lost, so this is not a great option for steeper pitches.)
Similar to the Pull Cord method, when multipitching one only needs enough lead line to get to the top anchor, but not enough for doubled-over rope retrieval. Once to the top anchor, fix the tail of the rope, rap back down to the lower anchor to clean and then jug ascend or TR solo to follow yourself. If there is extra tail left past where the rope is fixed at the top anchor, it is a good idea to add a blocker knot to the end! It can be easy to start rapping down the wrong strand if not paying close attention.
More LRS
How-To-Videos from Avant Climbing Innovations at YouTube.