

Mountain guide series: Companion Rescue
Mountain guide series
Since autumn 2022, the mountain guide associations of Switzerland, Austria, Germany and South Tyrol have been on board as editorial advisory boards. Since then, a contribution from these associations has appeared in every issue. The series is intended to provide information and at the same time encourage constructive dialogue, thereby indirectly developing mountain guide training further.
(caution – automatic tranlation!) The makeshift mountain rescue is one of the most complex and therefore riskiest topics in mountaineering in terms of rope technology, alongside the securing of traverse routes from the rear. In contrast to crevasse rescue, this topic is only briefly covered in the courses offered by alpine schools and alpine clubs and is at best offered on a voluntary basis in advanced training courses.

Nevertheless, we recommend that every committed mountaineer familiarise themselves intensively with the subject, not to avoid a rescue by professional mountain rescue services, but to make progress if professional help can only be expected after a very long delay, e.g. due to the weather. We recommend intensive dry training for all users, preferably under professional guidance.
The makeshift nature of these techniques must also be emphasised. Some of these techniques involve increased risks, which must be weighed against the benefits in an emergency. For training, we recommend practising the techniques intensively near the ground and on solid fixed points (bolts).
Overall, makeshift mountain rescue naturally goes hand in hand with first aid for the patient. Both are therefore taught and applied in an integrated manner on the mountain guide training courses. As first aid is well publicised (see the Alpine Emergency series), we have not included it in this article.
We assume that the patients in our examples have been examined according to the CrABCDE protocol, wounds have been treated, and limbs have been splinted and stabilized. While the patients are unable to act on their own, they are otherwise fit for transport.
Rescue scenarios and solutions
Below, we present several scenarios from the mountain rescue training of the VDBS (German Association of Mountain and Ski Guides) along with possible solutions. All scenarios require complex problem-solving skills and the deliberate, forward-thinking combination of different rope-based rescue techniques (“modules”).
Im Nachfolgenden stellen wir einige Szenarien aus der Bergrettungsausbildung des VDBS und deren Lösungsmöglichkeiten vor. Alle Szenarien erfordern komplexe Problemlösungsfähigkeiten und das durchdachte und vorausschauende Aneinanderreihen unterschiedlicher seiltechnischer Werkzeuge (Module). For simplicity, we refer to the rescuer as “RP” (rescuing person) and the injured individual as “VP” (victim person).

Second climber fall on a traverse
One scenario our aspirants must resolve is as follows: Your second has fallen during or just before a traverse, sustained an injury, and is no longer able to assist in their own rescue. A simple lower to the ground is not possible due to the terrain, and the traverse—equipped with multiple clipped quickdraws (which we deliberately protect well in traverses)—prevents a direct haul using a body-lift from the anchor.
The quickdraws in the traverse are mostly loaded by the victim’s weight, making it impossible to simply unclip them.
Releasing the intermediate protection
The rescuer (RP) must first secure the belay system with a releasable block (e.g. by tying an autoblock or mule knot on the HMS or using a belay plate secured with a knot – see Fig. 1, “module: blocked belay”). Then, RP must descend or traverse toward the victim (VP). This is best done using an improvised mountain rescue personal lanyard.
A 120 cm sewn sling is doubled and girth-hitched into the belay loop. One strand should be approximately 15–20 cm longer than the other. A locking carabiner is attached to each strand using a clove hitch or girth hitch. The longer arm is clipped into a sewn, high-strength short prusik (Dyneema or Kevlar), which has been triple-wrapped around the tensioned rope to the victim.
The shorter arm is clipped directly into the tensioned rope (see Fig. 2). This improvised setup functions like a via ferrata kit, allowing the RP to descend or traverse along the loaded rope toward the VP. With some practice, the prusik can be clipped through the carabiners of the intermediate quickdraws without removing them (see Fig. 3).

Clipping the prusik through the quickdraws is straightforward; if needed, the prusik can be pulled through the carabiner with a short, controlled tug. Illustration: Georg Sojer
Once the rescuer (RP) reaches the injured second (VP), they administer first aid. Afterward, the RP climbs back up to the first piece of intermediate protection. The quickdraw now needs to be unclipped while under load.
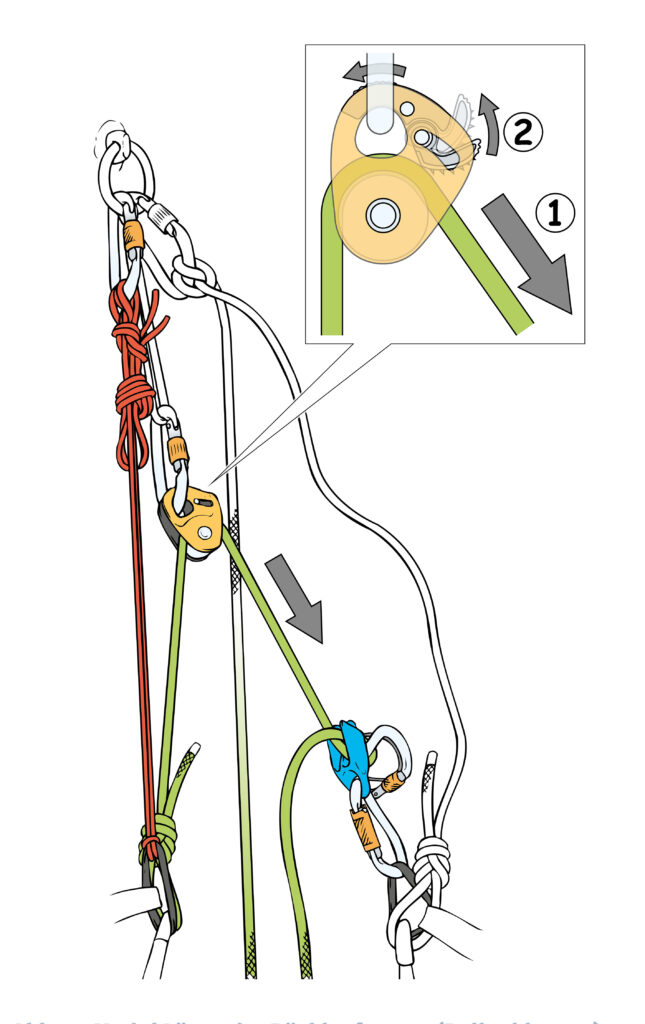
To do this, a 5–6 meter accessory cord is tied to the rope’s single strand using a Prusik knot. The free, long end of the cord is threaded through the carabiner of the loaded quickdraw, wrapped once around the climbing rope, and threaded through the same carabiner again. The cord is then shortened and fixed to the RP’s harness tie-in point using a Munter hitch with a slip knot (backup). The RP transfers full body weight onto the cord (repositioning the improvised self-belay accordingly). This effectively shortens the rope to the intermediate anchor point.
If needed, the RP can push away from the wall to add extra tension. The now-unloaded quickdraw can be unclipped. The slip knot is released, and rope is gradually fed into the Munter hitch, allowing the RP — and thus the VP — to pendulum slowly into the fall line beneath the next piece of protection. (Fig. 4)

The RP then ascends along the tensioned rope to the next quickdraw and repeats the same process until all intermediate points of protection have been removed and the RP is back at the belay stance. At this point, the rope leading to the VP runs vertically and unobstructed.
Raising the casualty via counterbalance haul
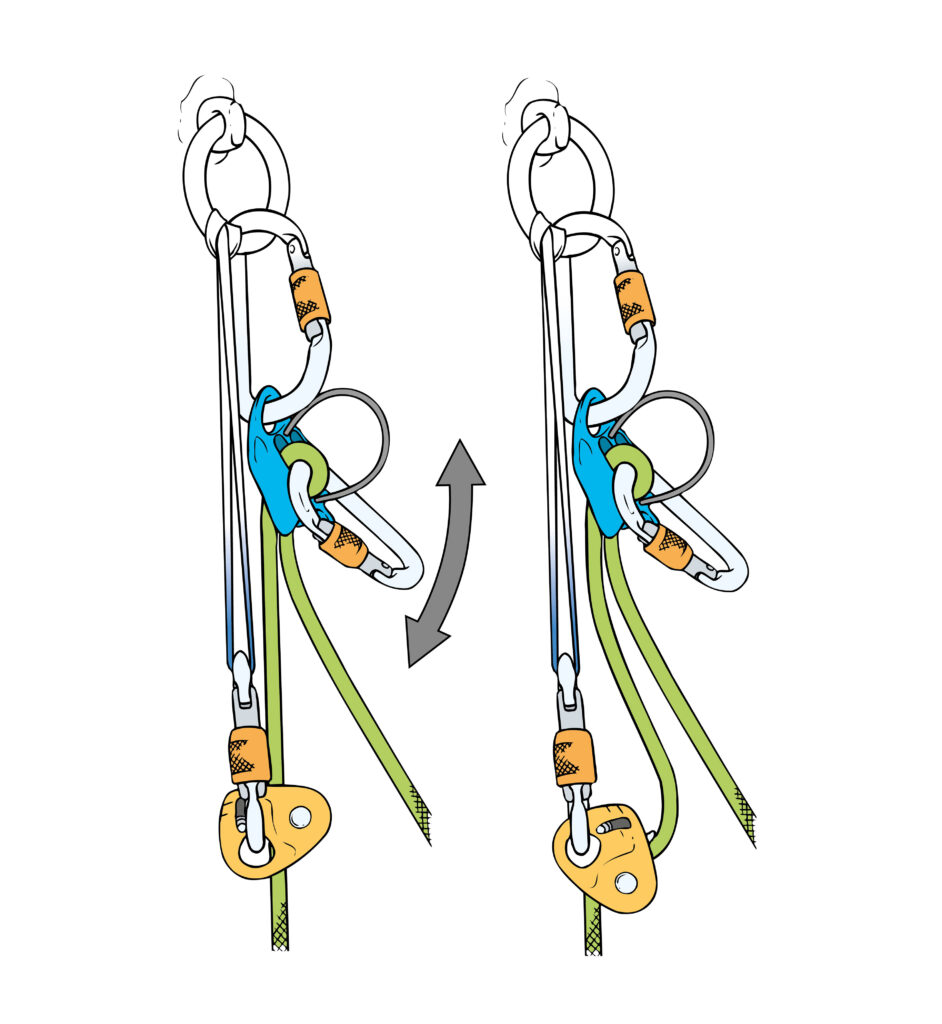
Since the VP’s belay has already been secured in a releasable configuration, the RP now sets up a hauling system with a progress-capturing device. The ideal option is a Micro Traxion (alternatively a Nano Traxion or Spoc), which can be attached below the VP’s secured belay knot (see Fig. 5 and Fig. 6). Once the progress-capturing pulley is in place, the load is transferred onto it, and the Munter hitch belay can be dismantled.

If the VP is hanging on a slab, the load is transferred onto the Micro Traxion by “pumping” the locking carabiner (see Fig. 7). In any case, the VP ends up suspended on the Micro Traxion. The RP then sets up an additional progress-capturing device on the unloaded rope, using a guide-mode belay plate, and clips it to their harness (Fig. 8).

lly, extend your personal tether — but do not disconnect it. The system works like an elevator: once the RP is below the VP, the motion cannot be stopped. It only comes to a halt when the VP’s knot hits the redirect pulley.
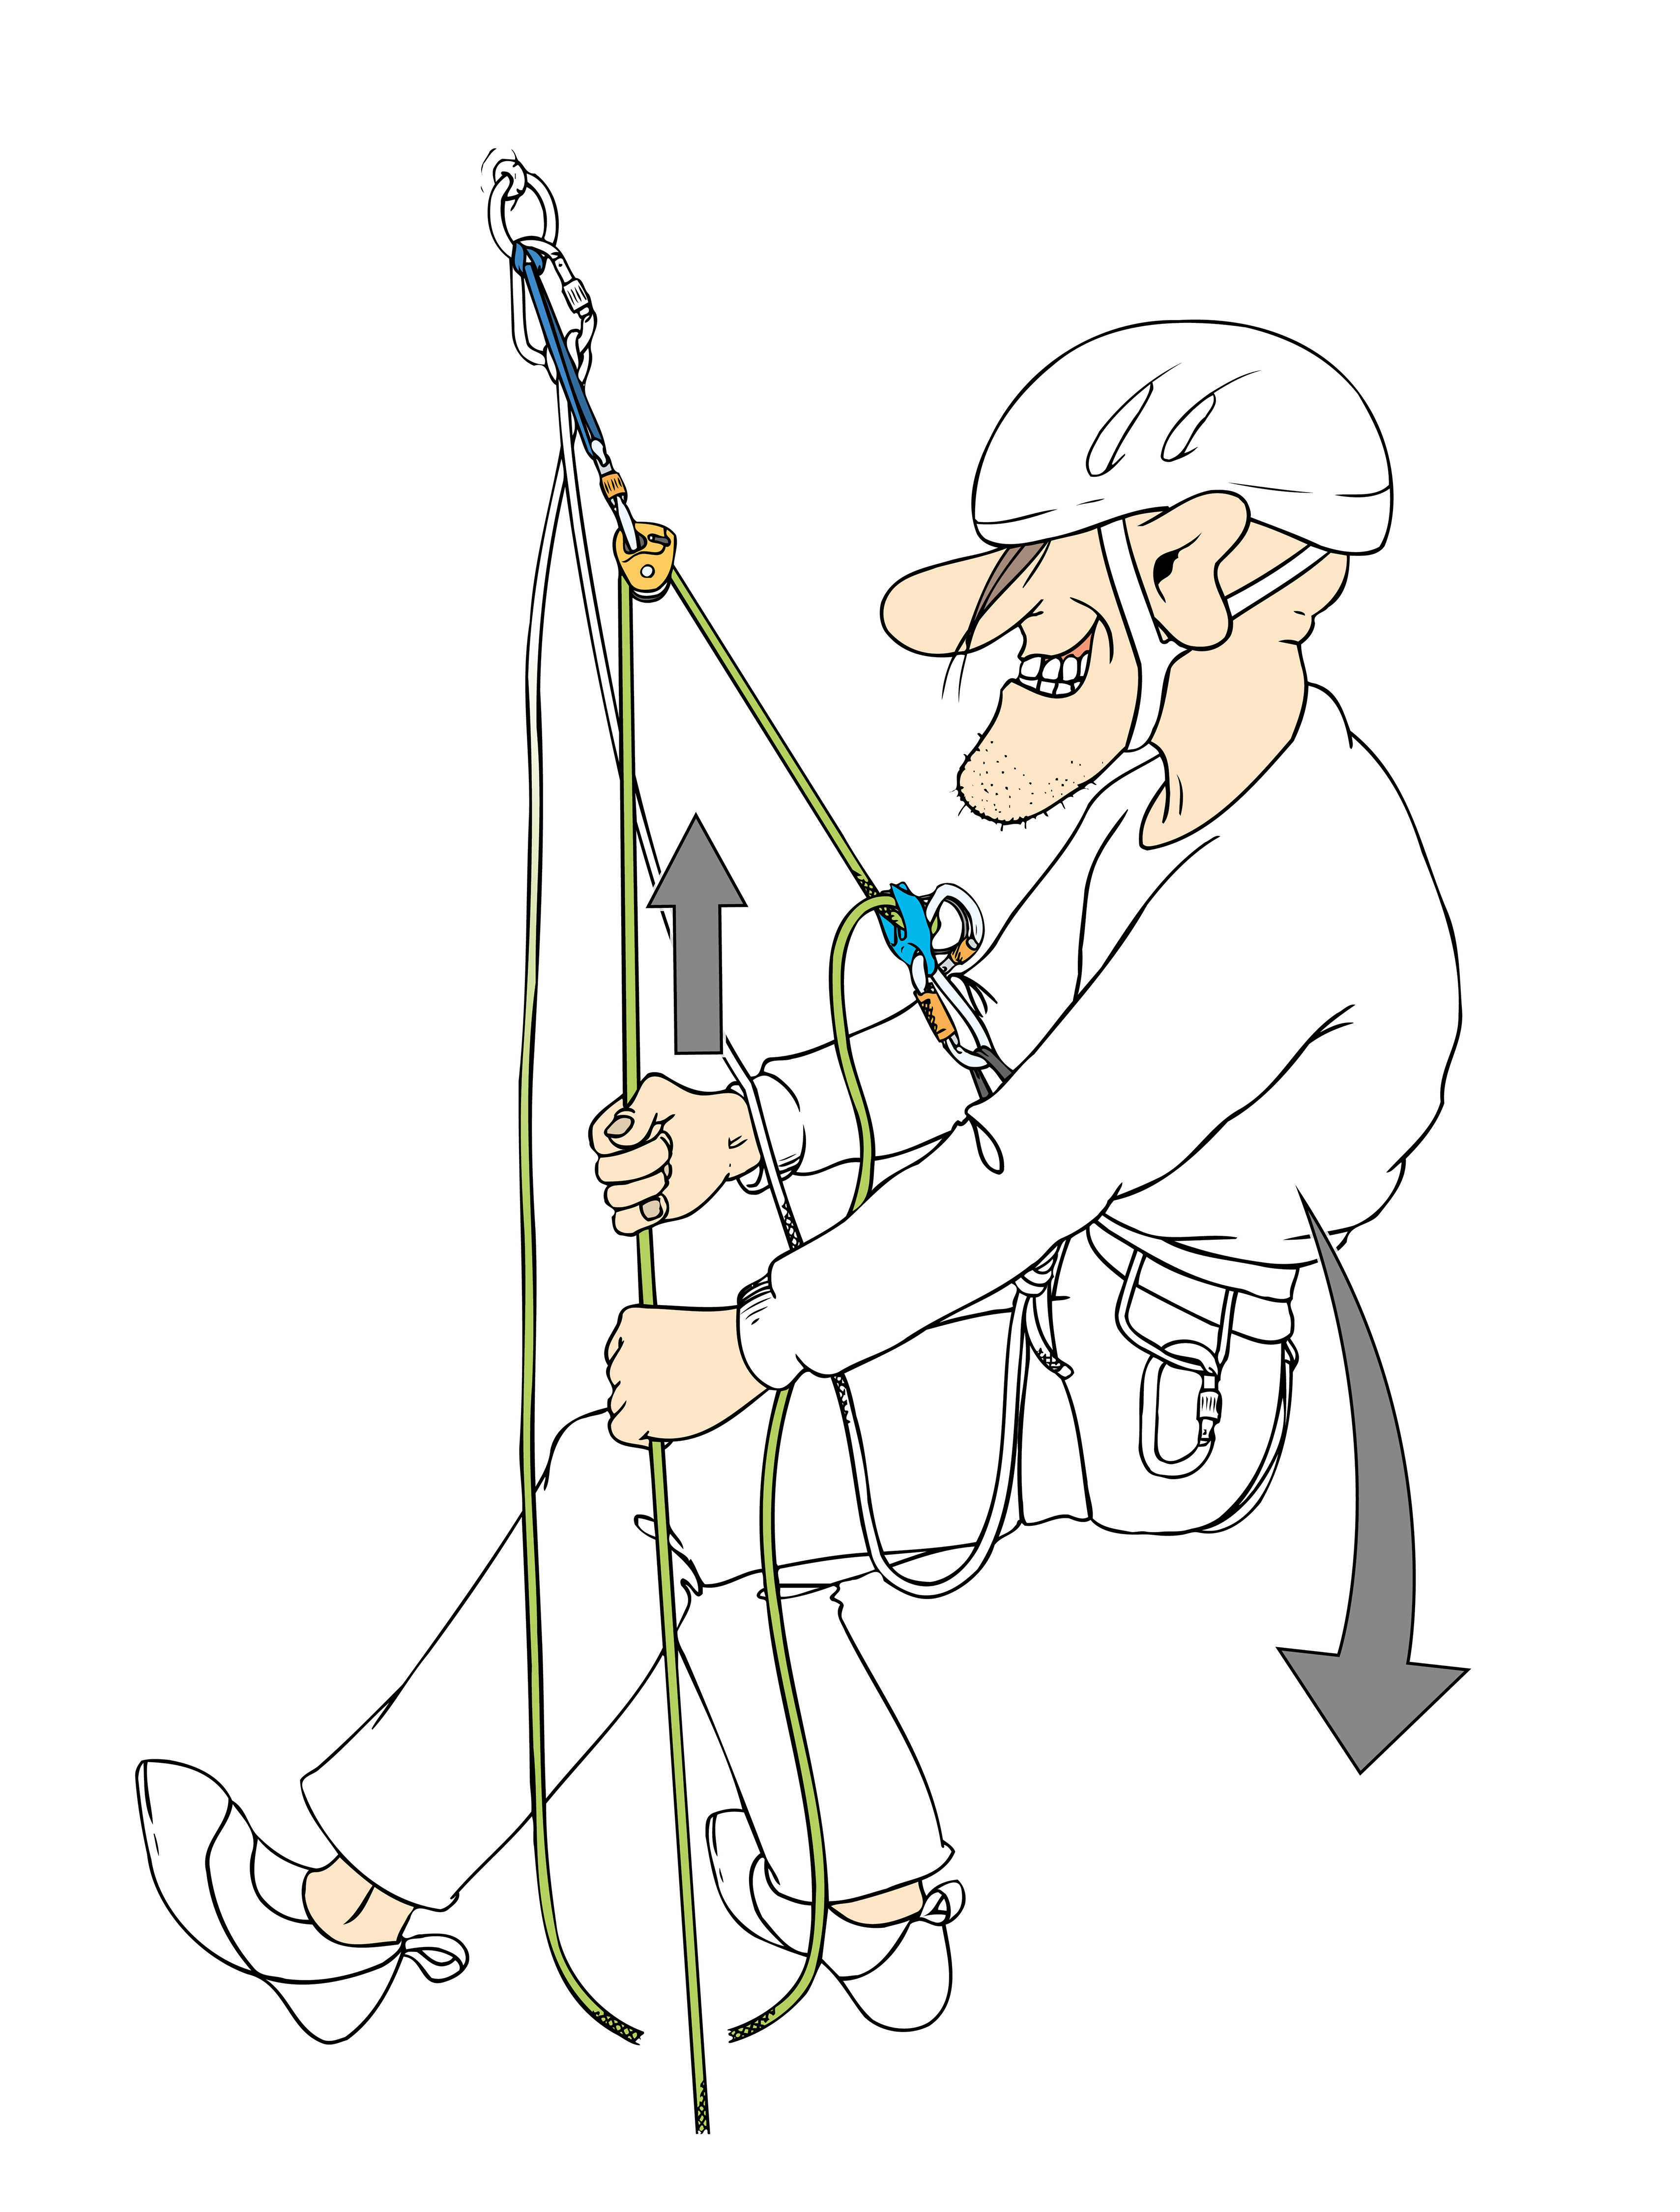
Now the hauling of the injured person can begin. The rescuer (RP) clips into the haul rope and uses their own body weight, together with pulling on the load strand, to lift the victim (VP). Once the extended personal tether is taut, the RP pulls themselves back up to the anchor using the progress capture device (belay plate in guide mode). This marks the start of a new hauling cycle.
The optimal working length is determined by the stand’s configuration and adjusted via the tether. In steep, exposed terrain, short haul strokes are safer and more efficient. In flatter or less exposed terrain, the tether can be extended several meters if the RP can pull themselves up more easily (see Fig. 9).
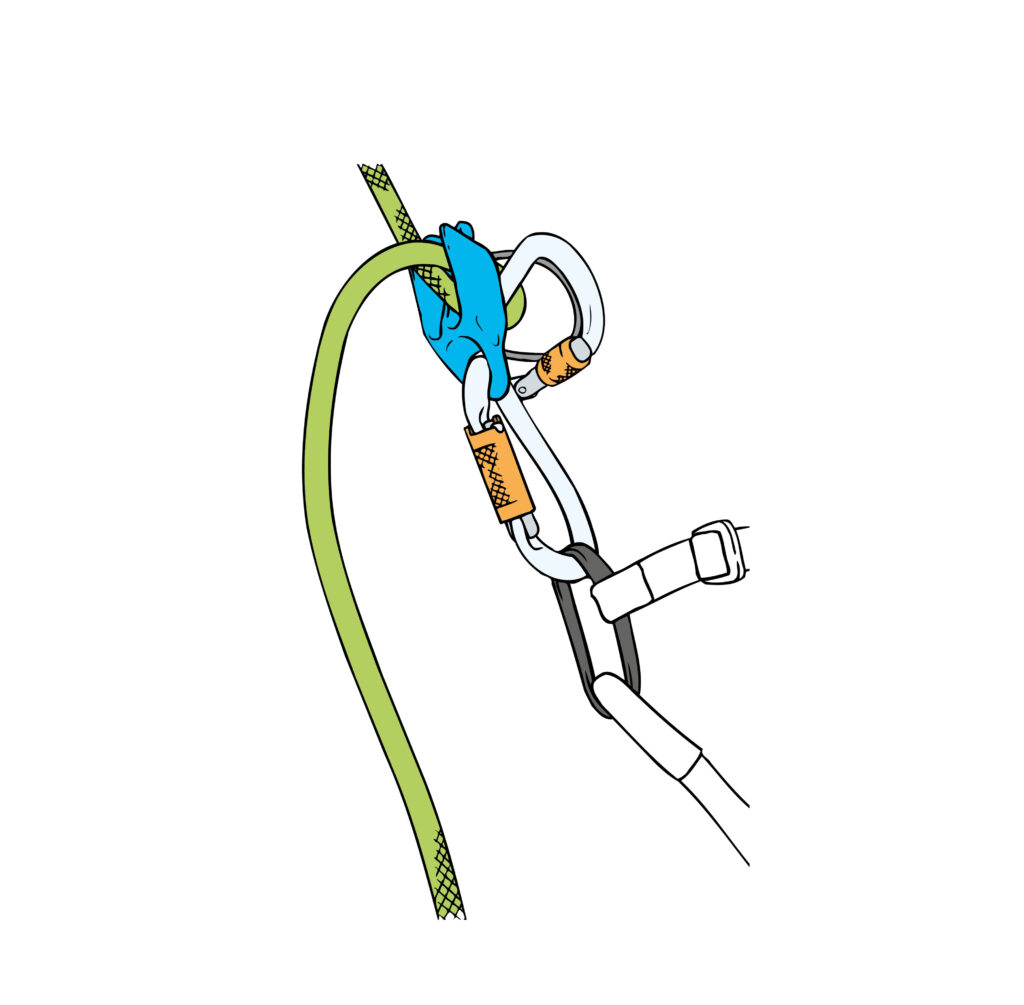
Just before reaching the VP, extra care is needed: it’s easy to jam the VP’s tie-in knot into the Micro Traxion. Before that happens, set up a releasable anchor — ideally using a prusik cord with a Münter mule knot or a gear sling setup. Then release the load from the Micro Traxion and transfer the VP into the new anchor system (Fig. 10).

To do this, establish a taut personal anchor system for the victim (VP). Then, apply controlled tension using a body lift (just a few centimeters) while simultaneously opening the cam of the pulley. Once the cam is released, the load can be transferred into the pre-rigged (!!) personal anchor of the VP. Illustration: Georg Sojer
Quick Guide: Body Hoist
- Secure the victim (VP) with a releasable system
- Attach a Microtrax to the loaded rope just below the belay; keep it as short as possible
- Transfer the load onto the Microtrax (release friction knot or “pump” the belay plate, then dismantle the original belay)
- Install a guide-mode plate on the unloaded rope and clip it to your harness
- Extend your personal anchor and begin lifting — pull on the load rope while hoisting!
Simul-rappelling with the injured person
If the decision is made to evacuate the victim (VP) downward, everything is prepared for the 1-person rescue descent. The VP is transferred into the rescue harness (e.g. a rescue triangle or “rescue spider”) using a releasable suspension system (see fig. 11: friction hitch on accessory cord). This system is already connected to a rope that is pre-rigged for rappelling (fig. 12).

The rescuer (RP) now takes the VP onto their back and rappels together with them (fig. 13). To avoid shifting of the load during descent, the VP can be secured to the rescuer using quickdraws clipped to both harnesses. A personal safety backup — such as a short prusik or any form of hands-free backup — is mandatory for the RP. The steeper the rappel, the more efficient this technique becomes.

In less steep terrain, only brute strength helps. Once at the next anchor, the VP should be secured as high as possible using the releasable suspension. If needed, the HMS can be clipped directly through a fixed anchor (fig. 14), which saves a carabiner. Once the VP is secured, the RP removes the rescue harness (rescue spider) and rappel device, retrieves the rope, and prepares it for the next pitch.

Once the rescue spider is properly rigged again, the VP is transferred into it via the releasable connection and the next rappel begins. Special care is needed near the ground: the VP should ideally be lowered into a seated position with their upper body elevated. To do this, the RP rotates away from the wall just before touching down and slowly lets both descend into a seated landing.
At the base of the wall, the VP can either be transported further or stabilized using an improvised backpack stretcher and kept as warm and well cared for as possible until professional rescue arrives.
Quick guide: one-person rescue method
- Prepare rappel and rescue spider
- Load rescue spider, engage prusik
- Lower VP from releasable suspension into rescue spider
- Rappel down to next anchor
- Secure VP at anchor using releasable suspension
- Self-secure, dismantle rescue spider, retrieve rope
- Repeat from step 1